How to Clean Headlights | Foggy and Yellow Headlight Cleaning Tips
Find out how to clean your car headlights, whether they’re dirty, yellowed or have condensation. Learn more about your car with Panda Hub.
Use AI to summarize this article:
Headlights are made from polycarbonate plastic, a material that offers durability but is prone to oxidation. Over time, exposure to ultraviolet (UV) rays breaks down the protective coating on the surface, leading to a yellowish haze. Road debris, moisture buildup, and environmental contaminants further accelerate this process, reducing light output and affecting visibility at night.
Steps to Clean and Restore Headlights Permanently
Step 1: Preparation and Cleaning
- Wipe down the headlight lens and surrounding areas using a microfiber towel to remove dirt and debris.
- Dry the headlight completely to prepare for sanding.
- Apply masking tape around the headlight to protect the car’s paint from accidental sanding damage.
Step 2: Remove Oxidation with Sanding
- Choose the appropriate sandpaper grit based on oxidation severity:
- 600-grit for heavy oxidation
- 1500-grit for refining scratches
- 3000-grit for final smoothing
- Wet the sandpaper and the lens, then sand in one direction (horizontal or vertical) to ensure uniform abrasion.
- Wipe off excess residue and switch to finer grit sandpaper, alternating sanding direction to remove previous scratches.
- Continue the process until the surface appears evenly hazy without visible yellowing.
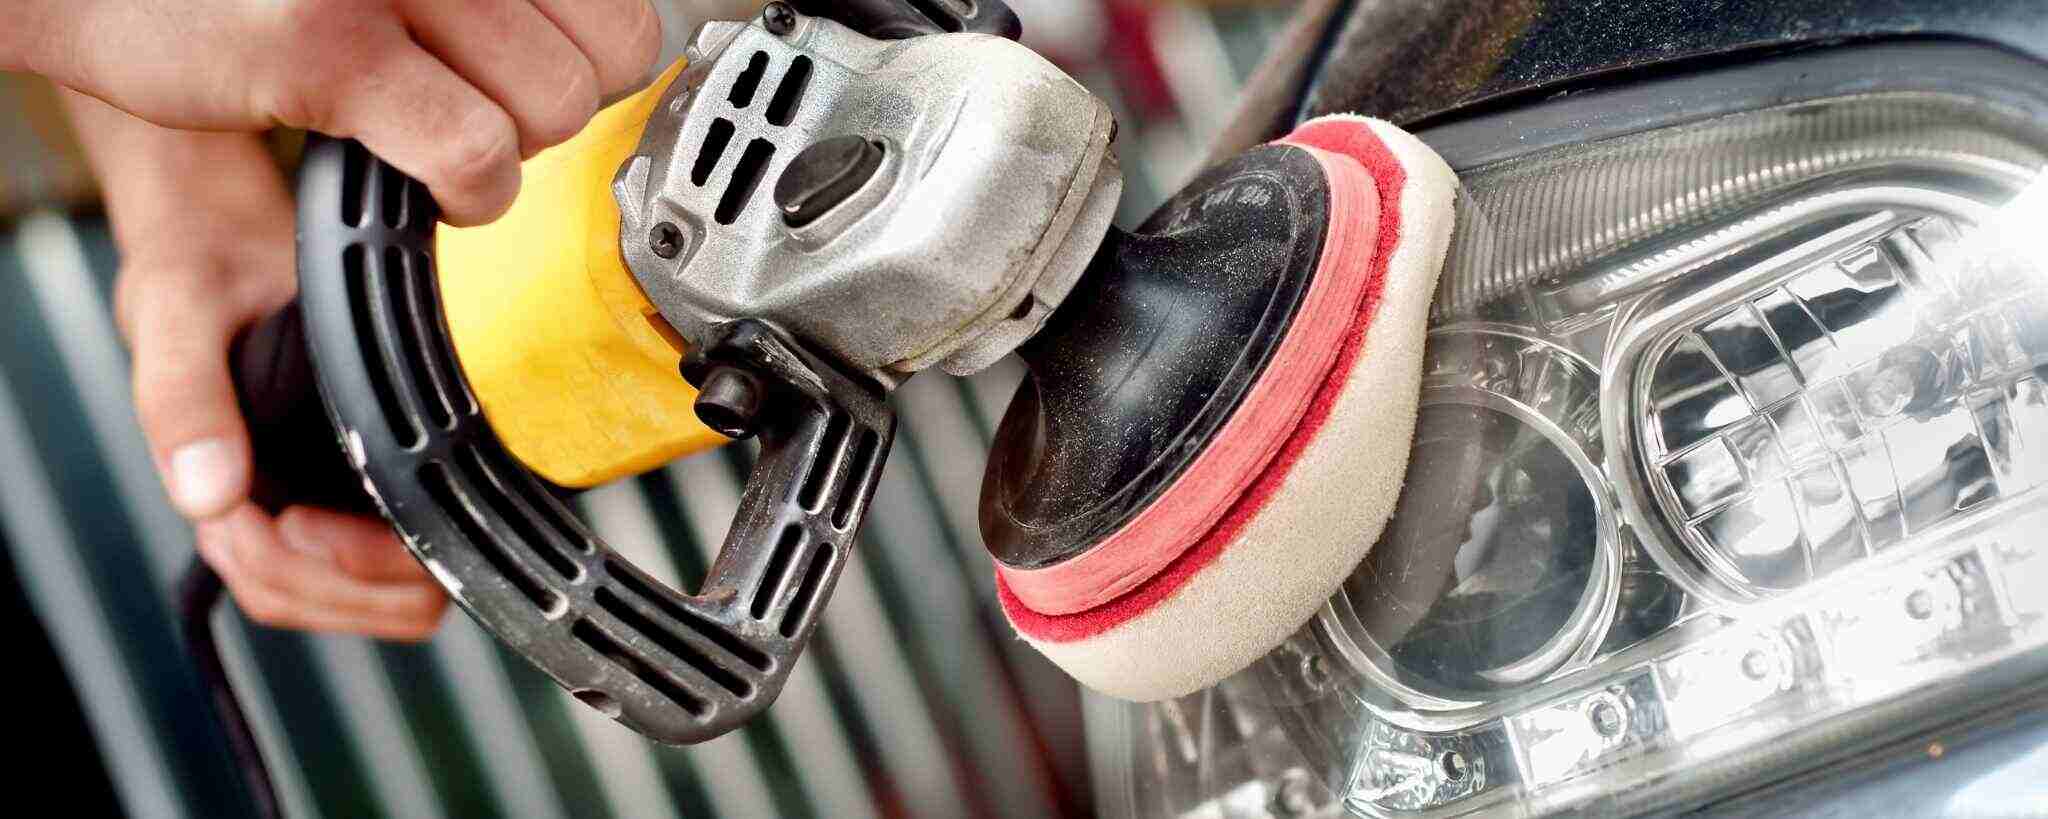
Step 3: Polish the Headlights
- Apply the cutting compound onto a clean microfiber towel or a drill-mounted wool pad for faster results.
- Buff the headlight in overlapping motions, keeping the pad flat against the surface to avoid uneven pressure.
- Switch to a foam pad with polish for extra clarity and shine (optional).
- Wipe the lens clean with a microfiber cloth to reveal a restored, clear finish.
Step 4: Apply a Protective Coating
- Choose a UV-protective coating to prevent future yellowing. Options include:
- Aftermarket Headlight Coatings: Spray-on solutions that last about a year.
- Headlight Protection Film: Long-lasting solution that can be replaced when worn.
- Acrylic Clear Coats: Requires proper application to prevent distortion.
- Apply the selected coating according to instructions, ensuring a thin and even layer.
Step 5: Install Headlight Protection Film (Optional)
- Clean the headlight with isopropyl alcohol to remove residues.
- Spray the headlight and film with water, then place the film over the lens.
- Use a squeegee and heat gun to mould the film around the contours of the headlight.
- Trim excess film and allow it to set for a few days, ensuring full adhesion.

The Best Product for Cleaning Headlights
A headlight restoration kit containing a polishing compound, sanding pads, and a UV sealant is the most effective solution for long-term clarity.
Here are some of the best headlight restoration kits recommended by professional detailers:
1. Cerakote Ceramic Headlight Restoration Kit: Long-Lasting Protection
- Three-step restoration process: oxidation removal, fine sanding, and ceramic clear coat
- Highly scratch-resistant coating prevents future yellowing and UV damage
- Durable finish and lasts longer than many other restoration kits
- Best suited for those looking for a permanent solution
2. 3M Headlight Restoration Kit: Best for Heavy Oxidation Removal
- Drill-assisted kit that includes multiple sanding discs (500, 800, 3000 grit) and a rubbing compound
- Removes deep oxidation and scratches for clear headlights
- Does not include a protective coating, so a separate sealant is recommended
- Great for professional-grade headlight restoration at home
3. Sylvania Headlight Restoration Kit: The Best Overall Performer
- Comprehensive restoration process with sanding, clarifying compound, and a UV-blocking clear coat
- Removes deep scratches and oxidation, improving light output significantly
- Superior long-term protection compared to many other kits
- Best all-around solution for restoring heavily oxidized headlights
4. Rust-Oleum Headlight Restoration Kit: Budget-Friendly Option
- A low-cost alternative for those on a budget
- Includes a polishing pad, gloves, and a microfiber towel
- Removes light oxidation but is not effective for severely yellowed headlights
- Lacks a protective coating, so results may fade faster
5. Rain-X Premium Headlight Restoration Kit: Best for Added Protection
- Includes sanding discs, a buffing polish, and a protectant wipe
- Removes oxidation while applying a protective sealant
- Not as aggressive as 3M for deep scratch removal but provides longer-lasting results
- Great for regular maintenance and UV protection
6. Armor All Headlight Restoration Wipes: Quick and Easy Fix
- Wipe-on solution for fast oxidation removal
- The two-step process includes oxidation removal and UV sealant protection
- Best for mild restoration, not effective for deep damage
- Ideal for a quick refresh rather than a full restoration
7. Meguiar’s Headlight Restoration Kit: Best for Mild Restoration
- Two-step process with a cleaning solution and UV-blocking headlight coating
- Works well for lightly oxidized headlights but lacks strong abrasives
- Good for preventative maintenance but not for deep restoration
- An easy-to-use option for maintaining clarity
💡Pro Tip: Without a protective layer, headlights will quickly oxidize again. Apply a UV-blocking headlight cleaner or clear coat to extend the life of the restoration.
DIY Headlight Cleaning Methods Using Household Items
Diminished brightness, a cloudy or yellowed appearance, and uneven light dispersion indicate that it is time to clean the headlights. The improper care of car headlights can require professional restoration or even replacement.
Here are some proven DIY methods to restore your headlights:
Cleaning Headlights with Toothpaste: How Long Does It Last?
Toothpaste acts as a mild abrasive, removing surface oxidation. Apply a non-gel, whitening toothpaste to a microfiber cloth and rub in circular motions for five to ten minutes. Rinse thoroughly and dry.
The results from toothpaste typically last a few months, but without sealing, oxidation may return.
Cleaning Headlights with Baking Soda and Vinegar: Best Homemade Solution
Mix two tablespoons of baking soda with one tablespoon of vinegar to create a thick paste. Apply the mixture with a soft cloth, rub in circular motions, and rinse.
This method is effective for cleaning plastic headlights affected by mild oxidation.
Cleaning Headlights with Magic Eraser: Does It Work?
A magic eraser can remove grime and light oxidation due to its melamine foam composition. However, excessive scrubbing may degrade the protective coating, making future oxidation faster. Use this method cautiously!
How to Keep Your Headlights From Turning Yellow Again
- Regularly wash headlights with mild soap and water to remove contaminants. Incorporating this into your regular exterior maintenance routine will help prevent UV damage and keep your entire vehicle looking new.
- Apply a headlight restoration kit every few months to maintain clarity.
- Park in shaded areas to minimize UV exposure.
- Consider applying a protective film for additional defence against oxidation.
FAQs About Cleaning Foggy Headlights
Is WD-40 Good to Clean Headlights?
WD-40 will make headlights look clear again by putting a thin layer of oil on them but it doesn’t remove oxidation. WD-40 is not a long-term solution and will attract more dirt over time.
Does Cleaning Headlights Make Them Brighter?
Removing oxidation and grime from headlights restores clarity and improves brightness and nighttime visibility. Foggy headlights scatter light inefficiently, reducing the distance illuminated by the beam.
Cleaning car headlights ensures the full intensity of the bulb hits the road, making it safer to drive in the dark.
When to Restore vs. Replace Your Headlights
If the plastic is severely degraded or internal condensation is present, cleaning alone may not be sufficient. Restoration using a professional-grade headlight cleaner is recommended before opting for a costly replacement.
Safe driving comes with a clear vision, and that starts with clean, bright headlights. With techniques we’ve covered and regular care, you can easily keep your headlights in top condition without breaking the bank.
Also remember that not all headlights are the same, and what works best for one car may not be the perfect solution for another. So, take your time to find the right method for your car and always take precautions to avoid unnecessary damage.
If you find that your headlights need more than a DIY solution or you simply want a professional touch, Panda Hub is here to help! We specialize in comprehensive car detailing services that go beyond the basics. Our expert detailers not only restore your car headlights to their full brightness but also take care of your car inside out.

Parham Koukia
Lead Car Detailer / Operations Manager
With nearly 15 years of hands-on detailing experience, Parham has become a trusted authority in the auto care world. His work is regularly spotlighted in leading outlets like CNN, GoBankingRates, and Family Handyman. Parham likes to share his knowledge to offer in-depth tips on equipment selections, seasonal car care, and some secret car cleaning tips used by detailers in the real world!
Read more


